Field Checklist for Leak‑Free Installation
- Cut & Deburr: Always cut tubing square and deburr both the internal and external edges. A smooth, burr‑free end ensures full ferrule bite and prevents leaks.
- Insert & Mark: Insert the tube fully into the fitting body and mark the tube at the nose of the nut or use a presetting tool.
- Finger‑Tight → Wrench Turns: After hand‑tightening, tighten the nut 1¼ turns for initial make‑up on most sizes. If using a preset tool, tighten ½ turn for up to 1 in. tubing and ¾ turn for tubing over 1 in..
- Tape & Lubricants: On taper threads (NPT), wrap PTFE tape clockwise on the male thread; it acts as a lubricant and fills the gaps. Do not use tape on straight threads or compression fittings.
- Back‑Up Wrench: Use a second wrench to hold the fitting body while turning the nut. This avoids twisting the tube and reduces galling.
- Pressure Test & Re‑Tighten: Test the assembled joint at working pressure. If minor leaks appear, tighten the nut a further 1/8 turn; never over‑tighten.
What “Leak‑Free” Means in Instrumentation
A leak‑free tube fitting joint maintains process integrity, prevents product loss and protects personnel. Leakage typically occurs at the ferrule bite, at the tubing end, or through the thread interface.
Compression tube fittings seal by mechanically compressing ferrules onto the tubing; no sealant is required for the tube end. By contrast, tapered pipe threads (NPT) achieve a seal through mechanical interference and require a thread tape or liquid sealant. Understanding where leaks form helps target preventive measures:
- Ferrule Bite & Surface Finish: A poorly cut tube, misaligned insertion or damaged ferrules can prevent proper bite. Always inspect the tube end, ensure full insertion and use manufacturer‑supplied ferrules.
- Thread Interface: Tapered threads need PTFE tape or sealant; failing to apply tape or cross‑threading can cause leaks. Straight threads (such as SAE or BSPP) rely on an O‑ring or gasket and do not need tape.
- Torque vs. Turns‑From‑Finger‑Tight (TFFT): Compression fittings are tightened by turns from finger tight, not by torque alone. TFFT ensures the ferrules deform correctly. For NPT threads, the “finger‑tight plus one to two turns” rule provides an adequate seal.
Leak‑free operation also depends on selecting the right material (e.g., 316 stainless steel for corrosive media) and ensuring compatibility with pressure and temperature ratings.
Tube Fitting Types & Where They Win
Modern instrumentation uses several types of tube fittings. Choosing the right design improves reliability and simplifies maintenance. Below is an overview of common styles:
Double‑Ferrule Compression Fittings (General Instrumentation)
Double‑ferrule fittings use a front ferrule to create a primary seal and a back ferrule to grip the tubing. They are the industry standard for most instrumentation applications because they resist vibration and thermal cycling.
AIMS Control offers stainless steel tube fittings in sizes from 1/16 in. to 2 in., with straight‑thread and taper‑thread end configurations. Use double‑ferrule fittings for high‑pressure lines, corrosive fluids and systems requiring frequent disassembly.
Single‑Ferrule Fittings (Compact & Cost‑Sensitive)
Single‑ferrule fittings compress the tubing with one ferrule and often have fewer components. They are more compact and sometimes more economical. Single‑ferrule designs are suitable for general process connections where space is limited and extreme vibration is absent. However, they may offer lower pressure ratings than double‑ferrule types.
Bulkhead Unions (Panel or Partition Transitions)
Bulkhead unions allow tubing to pass through a panel or instrument enclosure. They have compression ends on both sides with a hex nut in the middle to clamp against the bulkhead. AIMS Control’s bulkhead unions are available in stainless steel and brass. Use them when you need a secure, leak‑free transition through walls or panels.
Instrument Plugs & Caps (Temporary Isolation)
Instrument plugs and caps seal unused ports or temporarily isolate sections of a process line. Plugs insert into the fitting and are tightened similarly to standard ferrule assemblies. According to the GYROLOK manual, when installing a plug, insert the plug and tighten the nut hand‑tight, then wrench‑tighten ¼ turn. Caps cover the male ends of fittings. These components protect instruments during calibration or maintenance and prevent debris ingress.
The Definitive Assembly Procedure (How‑To)
Proper assembly ensures that ferrules bite uniformly and seals are leak‑tight. The following step‑by‑step instructions align with industry manuals and AIMS Control’s best practices. Use them alongside manufacturer guidelines.
- Cut & Deburr: Cut the tubing square using a tube cutter or saw. Remove internal and external burrs with a deburring tool or file. Burrs can interfere with ferrule sealing and create leak paths.
- Mark Insertion Depth: Fully insert the tube into the fitting body. Mark the tube at the back of the nut or use a presetting gauge. This ensures you can verify full insertion during assembly.
- Finger‑Tighten: Slide the nut and ferrules onto the tube (back ferrule first, then front ferrule). Screw the nut onto the fitting body until it is finger‑tight. The GYROLOK manual suggests marking the nut and body as a reference for wrench tightening.
- Wrench Tighten – First Make‑Up: For initial assembly of most double‑ferrule fittings, tighten the nut 1¼ turns beyond finger‑tight. Use a backup wrench to hold the body. Tighten smoothly; you will feel the ferrules “set” against the tubing. Do not rely solely on torque—use turns from finger tight (TFFT) for consistency.
- Presetting Large Sizes (Optional): For tubing 5/8 in. (16 mm) and above, pre‑set the ferrules using a hydraulic or manual presetting tool. After presetting, insert the tube and tighten ½ turn for tubing up to 1 in. (25 mm) or ¾ turn for larger sizes.
- Inspection: After tightening, check that the mark on the tube has moved with the nut (indicating the tube has not pulled out). If a marking tool was used, verify that the witness line on the fitting body is visible.
- Pressure Test: Test the assembly using hydrostatic or pneumatic pressure. Increase to working pressure and inspect for leaks. If leakage is observed, tighten the nut an additional 1/8 turn.
- Remake & Maintenance: When remaking an existing connection, loosen the nut, reinsert the tube fully and re‑tighten the nut ¼ turn beyond snug. Do not exceed one additional make‑up; if repeated re‑make is required, replace the ferrules and nut.
Torque Values & Turns‑From‑Finger‑Tight (Reference Table)
Different tube sizes and materials require different tightening. Manufacturers typically publish torque charts. The table below shows typical torque values and TFFT ranges for 316 SS double‑ferrule fittings. Always consult AIMS Control’s specifications for exact values.
| Tube O.D. (in.) | Material | Fitting Type | TFFT (turns from finger‑tight) | Approx. Torque (N·m) | Approx. Torque (lbf·ft) |
| 1/8 (3 mm) | 316 SS | Double‑ferrule | 1 – 1¼ | 8–12 | 6–9 |
| 1/4 (6 mm) | 316 SS | Double‑ferrule | 1¼ – 1½ | 18–28 | 13–21 |
| 3/8 (10 mm) | 316 SS | Double‑ferrule | 1¼ – 1½ | 34–47 | 25–35 |
| 1/2 (12 mm) | 316 SS | Double‑ferrule | 1¼ – 1¾ | 54–75 | 40–55 |
Note: These values are illustrative. Always refer to the manufacturer’s torque chart. If torque is used instead of TFFT, apply lubricant to threads to reduce friction and compensate for material differences.
Galling in Stainless Threads – Causes & Prevention
Galling is a form of adhesive wear that occurs when mating stainless steel surfaces seize under pressure. When assembling tube fittings, galling can occur on the thread of nuts, bodies or pipe ends. Causes include:
- Metal‑to‑metal friction: Stainless steel lacks lubricity; under high loads, microscopic welds form between threads.
- High tightening speed: Rapid tightening generates heat, increasing the risk of galling.
- Lack of lubrication: Unlubricated threads have higher friction and increase galling risk.
Prevention Tips
- Lubricate Taper Threads: PTFE (TFE) tape or liquid sealant acts as a lubricant and fills the gap between the crests and roots of tapered threads. Wrap the tape clockwise on the male taper thread, with at least one full wrap (1¼ turns recommended). On stainless steel, a double wrap is recommended to minimize galling and ensure a good seal. For straight threads, use an O‑ring or gasket—do not use tape.
- Use Anti‑Seize Compounds: For stainless‑to‑stainless threaded connections (e.g., instrument plugs into NPT ports), apply a nickel‑ or molybdenum‑based anti‑seize compound. These lubricants provide a barrier between mating surfaces and reduce galling.
- Slow, Smooth Tightening: Turn the nut slowly and steadily using hand tools. Avoid using impact or power tools on stainless steel fittings.
- Material Matching: Whenever possible, mate stainless steel with brass or coated steel components to reduce galling. If both male and female parts are stainless, lubrication is essential.
- Inspect Threads: Do not use fittings with damaged or dirty threads. Debris increases friction and the risk of seizure.
Do’s & Don’ts – Quick Field Checklist
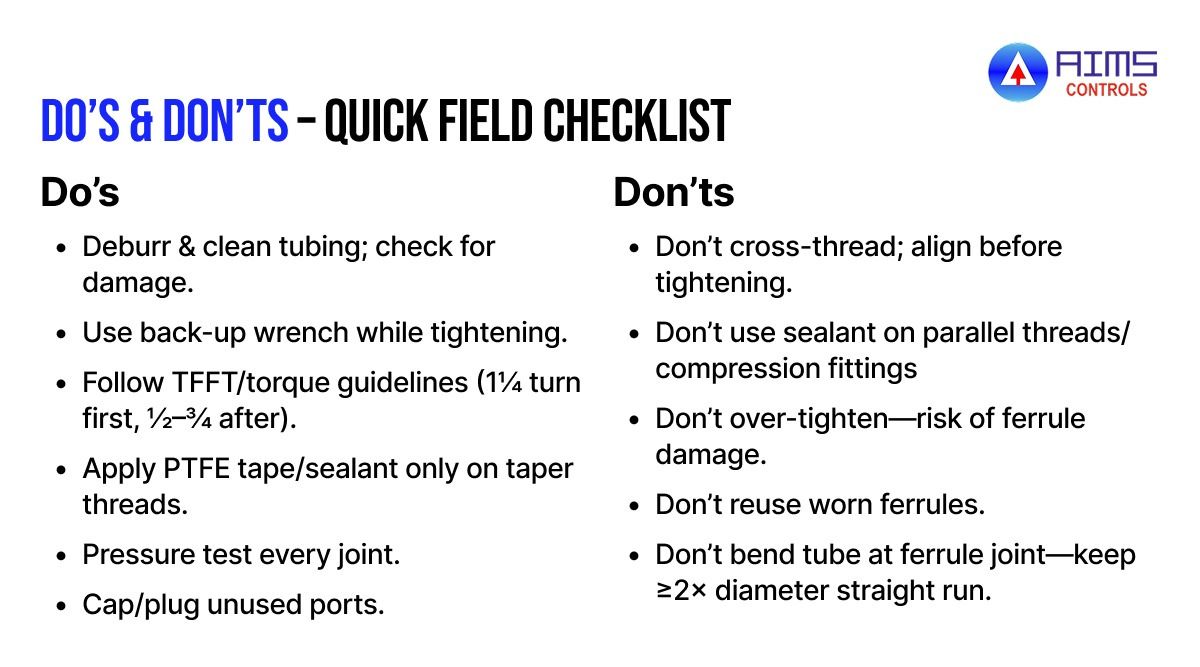
Do’s
- Deburr and clean tubing before assembly; inspect for scratches or ovality.
- Use a back‑up wrench on the fitting body while tightening the nut.
- Follow TFFT/torque guidelines: 1¼ turns for initial make‑up; ½–¾ turn for preset ferrules.
- Apply PTFE tape or sealant on taper threads, wrapping clockwise; double wrap for stainless.
- Pressure test each joint after assembly.
- Cap or plug unused ports to keep systems clean and prevent accidents.
Don’ts
- Don’t cross‑thread; always align the nut and thread before tightening.
- Don’t use tape or sealant on parallel threads or compression fittings—use an O‑ring or gasket instead.
- Don’t over‑tighten: more torque does not equal better sealing and may damage the ferrules.
- Don’t reuse ferrules after multiple make‑ups; they lose sealing effectiveness.
- Don’t bend the tube at the ferrule joint; maintain at least 2× the tube diameter of straight run after the fitting.
Troubleshooting: If It Still Leaks
Even with careful assembly, leaks can occur. Use the following guidelines to diagnose and fix issues:
- Leak at the thread: Ensure PTFE tape is properly applied to tapered threads—clockwise wrap, covering at least one full revolution. Check that the tape does not overhang the first thread; excess tape can fray and cause leaks. For straight threads, check the O‑ring or gasket for damage; replace if worn.
- Leak at the ferrule bite: A leak between the tube and ferrule often indicates improper insertion or insufficient tightening. Disassemble, inspect ferrules and tube for damage, and remake the connection following the proper TFFT guidelines.
- Leak at the bulkhead union: Verify that the bulkhead nut is tightened securely against the panel and that the panel thickness matches the fitting specification. Tighten the compression nuts with a back‑up wrench.
- Leak after reassembly: When reassembling an existing connection, tighten the nut only ¼ turn beyond snug. Over‑tightening on remakes can distort ferrules and cause leaks.
- Surface scratches or ovality: Inspect the tube surface; scratches or out‑of‑round tubing can prevent proper sealing. Cut and prepare a new section of tube.
Materials, Pressure & Temperature Cheat‑Sheet
Selecting the right material and pressure rating ensures reliability.
- Materials: Stainless steel (SS316/SS316L) offers excellent corrosion resistance and high pressure ratings. Brass fittings are suitable for water, air and inert gases but not recommended for corrosive media. For aggressive chemicals, consider Monel or Hastelloy (special order). Avoid mixing dissimilar alloys where galvanic corrosion may occur.
- Pressure: Tube fittings are rated by working pressure, which depends on tube size, wall thickness and material. A 1/4 in. 316 SS compression fitting can exceed 6,000 psi (414 bar), whereas a similar brass fitting may be limited to 3,000 psi. Always check manufacturer tables.
- Temperature: 316 SS fittings operate from ‑425 °F to 1,000 °F (‑254 °C to 538 °C). PTFE tape has a temperature limit around 450 °F (230 °C). For higher temperatures, use metallic sealants or graphited anti‑seize.
- Media Considerations: For oxygen and hydrogen service, ensure lubricants are oxygen compatible. Avoid oils or greases that can react. For steam or hot condensate, ensure ferrule material is rated for high temperatures.
Procurement Shortlist
Looking for parts? AIMS Control carries a full line of instrumentation fittings and accessories:
- Tube Fittings – Stainless and brass compression fittings, elbows, tees, crosses and adapters. Choose from double‑ and single‑ferrule designs with NPT, BSPP and SAE end connections.
- Bulkhead Union – For through‑panel connections. Available in sizes from 1/16 in. to 1 in., with nut and body sets included.
- Instrument Plugs & Caps – Seal unused ports or isolate sections during maintenance. Straight and tapered end options.
FAQs
Q: How many turns from finger‑tight should I tighten a ¼ in. stainless steel tube fitting?
A: For initial assembly, tighten 1¼ turns past finger‑tight. Use a back‑up wrench and tighten smoothly. After presetting (if applicable), tighten ½ turn.
Q: Do I need PTFE tape on compression tube fittings?
A: No. Compression fittings seal on the tubing and ferrules, not on threads. Use PTFE tape or liquid sealant only on tapered pipe threads (NPT). Straight threads rely on an O‑ring or gasket.
Q: What’s the difference between turns‑from‑finger‑tight and torque?
A: Turns‑from‑finger‑tight (TFFT) ensures the correct deformation of ferrules regardless of thread friction. Torque measures rotational force but can vary with lubrication and surface finish. Use TFFT for assembly and torque only as a secondary check.
Q: How can I prevent galling in stainless steel fittings?
A: Apply a suitable lubricant or PTFE tape to tapered threads; tighten slowly; and avoid using power tools. For stainless‑on‑stainless threads, a nickel‑ or molybdenum‑based anti‑seize reduces friction and prevents seizure.
Q: Can I reuse ferrules after disassembly?
A: Ferrules are designed for a single make‑up and a limited number of remakes. After two remakes, replace the ferrules and nut to ensure integrity. Always inspect the tube end for damage.
Conclusion
Achieving a leak‑free tube fitting connection is a combination of proper preparation, correct assembly technique and attention to detail. Following the manufacturer’s instructions—such as tightening 1¼ turns from finger‑tight, using ½–¾ turn after pre‑setting and applying PTFE tape on tapered threads only—is essential. Avoid over‑tightening and always use a back‑up wrench to support the fitting body.
Remember that tubing connections do not require thread tape or lubricant, saving installation time and reducing contamination risk. By following these steps and using quality fittings from AIMS Control, you can build reliable, leak‑free instrument lines that stand up to the demands of 2025 and beyond.